Key takeaways
- Galvanized steel — The Wall Control 30-P-3232GV galvanized pegboard pack is the reference point here: it won’t sag, accepts both pegs and slotted accessories, and the metal face is magnetic, which is genuinely useful for small parts.
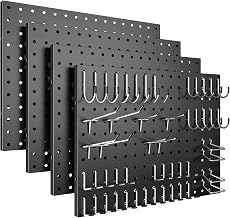
- Coated steel panel kits — Multi-packs such as the Spampur 4-pack with 50 hooks, the similar Heavy Duty 4-pack, or the 4-piece metal pegboard wall panels let you tile a wall in modular sections and reposition later. Powder-coated black reads as furniture rather than workshop, which matters in a bedroom or home office.
- Large all-in-one kits — The INCLY 48×36 kit with six panels and 234 accessories covers a full wall in one purchase and spares you the accessory-hunting stage.
- Hardboard — Cheapest per square foot and easy to cut, but it bows over time and hooks wear the holes. Fine for light craft storage, poor for anything heavy.
What's inside
I spend my working life talking to people about why they can’t fall asleep, and a surprising number of those conversations end up being about storage. A bedroom with tools on the dresser, craft supplies stacked beside the bed, or a closet that has quietly become a landfill sends a low-grade signal to the nervous system that the day isn’t finished. Vertical storage solves that faster than almost anything else, and pegboard is the cheapest, most adaptable vertical surface you can put on a wall. Mount it well and the clutter leaves the floor permanently. Mount it badly and you get a rattling panel behind your headboard, sagging screws, and a repair job at 2 a.m.
This guide covers the part most product listings skip: how to actually attach pegboard to a wall so it stays flat, stays quiet, and holds weight for years. You’ll learn how to find and use structural framing, why the gap behind the board is non-negotiable, how metal and hardboard panels differ in practice, what to do on masonry or plaster, and how to keep an installation from becoming a noise source in a room where you sleep.
As an Amazon Associate we earn from qualifying purchases.


Start With the Wall, Not the Board
Every good pegboard installation begins with a stud finder and a pencil. In standard North American framing, studs sit 16 inches on center, occasionally 24 in newer or garage construction. Mark the centre of each stud from floor to your intended top edge, then snap a level line for the board’s top. Screwing into drywall alone — even with anchors — is where most failures start, because pegboard loads are cantilevered: a hook holding a 5 lb item pulls outward at the top and levers the fastener. Structural framing absorbs that. If your stud spacing doesn’t line up with the panel edges, add a horizontal furring strip of 1×3 lumber screwed into every stud, then mount panels to the strips. This also gives you freedom to place panels wherever a room needs them rather than where the framing happens to be.
The Air Gap Is the Whole Point
Pegboard hooks work by hooking through the front face and bending back behind it. Without clearance, hooks won’t seat and will pop out under load. You need roughly ½ to ¾ inch of space between the board and the wall. Purpose-made spacers are the clean solution — a kit like the Hotop 24-set pegboard spacers with screws and washers handles both 1/8-inch and 1/4-inch boards and eliminates the guesswork of stacking washers. The alternative is furring strips, which give you a continuous gap and a stiffer assembly. Either way, place a spacer or strip at every stud crossing, including the middle of the panel, not just the corners. Unsupported centres are what flex and buzz.
Metal vs. Hardboard: A Practical Comparison
- Galvanized steel — The Wall Control 30-P-3232GV galvanized pegboard pack is the reference point here: it won’t sag, accepts both pegs and slotted accessories, and the metal face is magnetic, which is genuinely useful for small parts.
- Coated steel panel kits — Multi-packs such as the Spampur 4-pack with 50 hooks, the similar Heavy Duty 4-pack, or the 4-piece metal pegboard wall panels let you tile a wall in modular sections and reposition later. Powder-coated black reads as furniture rather than workshop, which matters in a bedroom or home office.
- Large all-in-one kits — The INCLY 48×36 kit with six panels and 234 accessories covers a full wall in one purchase and spares you the accessory-hunting stage.
- Hardboard — Cheapest per square foot and easy to cut, but it bows over time and hooks wear the holes. Fine for light craft storage, poor for anything heavy.
Masonry, Plaster, and Difficult Walls
On concrete or brick, drill with a masonry bit and use sleeve anchors or Tapcon-style screws directly through the spacers — no studs needed, and the holding power is excellent. Lath-and-plaster walls are the tricky case: the plaster is brittle and crumbles at the drill point, so drill slowly at low speed with masking tape over the mark, and locate the underlying studs rather than trusting toggle bolts. In rental situations, a freestanding pegboard frame or a panel mounted to a plywood backer hung on a French cleat gives you the same function with two small holes instead of twenty.
Keeping It Quiet in a Sleeping Space
This is the detail nobody mentions and the one that wakes people up. A metal panel with an air gap behind it is a drum. HVAC vibration, a door closing, footsteps upstairs — any of these can set a loosely fastened panel humming. Three fixes: tighten to firm contact against the spacers rather than leaving fasteners slightly proud; add adhesive felt or thin cork pads between the panel and each spacer to break the metal-to-metal path; and use rubber-tipped or vinyl-coated hooks for anything that dangles. Avoid mounting a large metal panel on a wall shared with a bed’s headboard if you can route around it.
Tips
- Dry-fit the panel with two screws before committing to all fasteners — it’s far easier to correct a level error at that stage.
- Leave 2 to 3 inches of clearance above any workbench or dresser so hooks can be loaded without knocking the surface.
- Trace hook positions with a pencil once you’re happy with the layout; things get put back correctly and the wall stays organized.
- Heaviest items go low and near a stud crossing. Weight high on the panel is what causes long-term bowing.
Frequently Asked Questions
How much weight can pegboard actually hold?
Properly mounted steel panels commonly handle 40 to 100 lb per panel, but the fasteners and framing set the real limit. Distribute load across multiple hooks and stud locations rather than concentrating it.
Can I mount pegboard without drilling into studs?
You can with heavy-duty toggle anchors for light loads, but for anything over a few pounds per hook, find framing. A mounted plywood backer board is the better workaround.
Do I need to paint or seal metal pegboard?
Powder-coated and galvanized panels need nothing. Bare hardboard benefits from a coat of primer and paint on both faces to slow moisture absorption and bowing.
What spacing should I use between multiple panels?
Butt them tightly and align the hole grid across the seam so accessories can span panels. Most modular kits are designed to tile continuously — check the grid before drilling.
Conclusion
Pegboard rewards a slow first hour: locate the framing, respect the air gap, choose steel if the load is real, and add felt pads if the wall is anywhere near where you sleep. Do that once and you get a storage surface that keeps floors clear, reduces the visual noise that quietly delays sleep onset, and adapts to whatever the room becomes next.