Key takeaways
- Cut 1×2 furring strips and screw them vertically into each stud, then mount the panel to the strips.
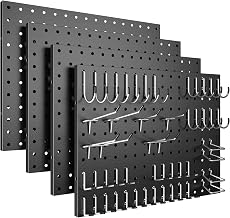
- Or use the plastic standoff spacers included with kits like the Pegboards Wall Organizer Panels (4-Piece), which are faster but transmit more vibration.
- Add a horizontal strip along the top and bottom edges to stop the panel from drumming.
What's inside
As a sleep-wellness practitioner, I spend most of my consultations talking about light, temperature, and wind-down routines — and a surprising amount of time talking about walls. The reason is simple: visual clutter in a bedroom or adjacent workspace keeps the nervous system in a low-grade state of task orientation. When your eyes land on a heap of cables, craft supplies, or half-finished projects at 10 p.m., your brain quietly files them as unfinished business. Vertical storage solves this by pulling objects off the floor and nightstand and organizing them into a single, predictable plane you can visually skim in one pass — or hide behind a door.
Pegboard is the most cost-effective way to build that plane, but a bad installation defeats the purpose. A panel that rattles when the door closes, sags under a tool bag, or sits flush against drywall so hooks won’t seat properly becomes its own source of irritation. Below, I’ll walk through panel selection, layout math, spacer construction, fastening, and load discipline — plus the small choices that keep a board silent enough to live in a sleeping space.
As an Amazon Associate we earn from qualifying purchases.


🛒 Best Price Today on Amazon
Prime members get fast, free shipping on everything above, plus member-only deals. New members get a 30-day free trial — cancel anytime.
Match Panel Material to the Room’s Acoustic Profile
Traditional 1/8-inch hardboard is cheap and easy to cut, but it flexes, absorbs humidity, and eventually crumbles around hole edges. For anything near a bedroom, I favor powder-coated steel. Metal panels resist sag, hold hooks with a tighter interference fit, and don’t shed dust. The Spampur 4-Pack Metal Pegboard Panels and the similar 110-Piece Metal Pegboard Kit both use modular squares, which is genuinely useful in a bedroom because you can install a narrow vertical strip beside a closet instead of committing to a full 4-foot slab. If you want a professional-grade single panel for a workshop or garage conversion, the Wall Control 4 ft. Metal Pegboard Kit is the sturdier choice — its formed edges and integrated mounting channel make it noticeably quieter under load than budget steel.
Plan the Layout Before You Drill Anything
Locate your studs first and let them dictate the board’s horizontal position — not the other way around. In North American construction, studs typically sit 16 inches on center, which aligns reasonably well with the 4-foot width of a standard panel. Mark stud centerlines with painter’s tape rather than pencil so you’re not erasing graphite later.
For height, use function rather than symmetry. In a bedroom or study, set the bottom edge around 40 to 48 inches from the floor so the board clears desks and dressers and stays outside your seated field of view. In a garage, 48 to 52 inches keeps heavy items at chest height, where lifting is safest.
Build the Spacer Gap — This Is the Step People Skip
Pegboard hooks work by passing through the hole and hooking behind the panel. Mounted flat against drywall, they cannot seat, and they’ll pop out whenever you remove a tool. You need roughly 1/2 inch of clearance behind the board.
- Cut 1×2 furring strips and screw them vertically into each stud, then mount the panel to the strips.
- Or use the plastic standoff spacers included with kits like the Pegboards Wall Organizer Panels (4-Piece), which are faster but transmit more vibration.
- Add a horizontal strip along the top and bottom edges to stop the panel from drumming.
Fasten Deliberately, Then Test for Noise
Drive 2.5-inch screws through the spacers into stud centers, spacing them roughly every 16 inches vertically. Snug them firmly, then stop — overtightening dimples steel and cracks hardboard, and a dimpled panel warps hooks out of alignment. If a stud isn’t available where you need one, use toggle bolts rated well above your intended load; standard plastic anchors are not adequate for a loaded board.
Before you hang anything, press your palm against the center of the panel and tap it. A dull thud means good contact. A hollow ring means you need another spacer or fastener behind that area — that ring is the sound you’ll hear at 2 a.m. every time the furnace kicks on.
Load It for Calm, Not Capacity
The organizational goal isn’t maximum density; it’s fast visual identification. Group by task, keep 20 to 30 percent of the board empty, and use bins for small loose items so your eye reads one shape instead of forty. The INCLY 278-Piece Pegboard Accessories Kit covers nearly every hook geometry for 1/8- and 1/4-inch boards, while the Peg Board Kit with Hooks and Bins (66-Piece, White) suits craft rooms and quieter interiors where a white finish disappears into the wall.
Tips
- Add hook locks or a dab of removable adhesive putty to any hook holding something you’ll grab frequently — this eliminates the metallic clink that carries through walls.
- Trace hook positions with a pencil once you’re satisfied with the layout, so restocking after a deep clean takes seconds.
- Keep the top row above 60 inches free of anything heavy; reaching overhead late at night is how people drop things on their feet.
- If the board faces your bed, choose matte black or white over bright finishes — glossy surfaces reflect lamp light and create glare in your periphery.
Frequently Asked Questions
Can I install pegboard without hitting studs?
You can, using properly rated toggle bolts, but limit the load substantially and distribute fasteners widely. For anything above about 20 pounds, find the studs.
Does metal or hardboard hold more weight?
Powder-coated steel, comfortably. Well-supported metal panels routinely handle heavy hand tools per square foot, while hardboard begins deforming much sooner, especially in humid rooms.
Is pegboard appropriate in a bedroom?
Yes, provided it’s silent and not overloaded. Mount it on a wall you don’t face while lying down, keep the palette neutral, and reserve it for items you actually use in that room.
How do I cut metal pegboard panels?
Most modular metal panels are sized so cutting is unnecessary — that’s their main advantage. If you must trim, use a jigsaw with a fine metal blade, then file the edge and touch up the coating to prevent rust.
Conclusion
A pegboard installed with proper spacing, stud-anchored fasteners, and disciplined loading does more than store your gear — it removes a persistent source of low-level visual noise from the rooms where you’re trying to unwind. Spend the extra twenty minutes on furring strips and the tap test, choose a panel material suited to the room’s humidity and acoustics, and you’ll end up with storage that stays quiet, stays level, and quietly supports better rest.