Key takeaways
- Moving with the deck raised. Extended actuator arms act like levers and can bend or snap under a side load.
- Carrying by the actuator or motor housing. Grip the frame rails only; the motor mounts are not handles.
- Standing the base on end. Frames are built to carry load downward through the legs, not through the head or foot rail.
- Leaving cables loose. Dangling wires snag on door frames and rip connectors out of the control box.
- Losing the leg hardware. Replacement legs from manufacturers often run $15 to $40 each plus shipping and can take weeks.
- Forcing connectors during reassembly. If a plug does not seat with light pressure, it is the wrong port or the wrong orientation.
- Skipping the test cycle. Any transit damage should be found before the mattress goes on and the warranty claim window closes.
An adjustable bed base is essentially a piece of furniture with a motor bolted to it, and moving one the way you would move a regular bed frame is how people end up with a $400 to $2,000 paperweight. Carry it with the deck raised and the actuator arms can bend. Yank the power cord and the control box connectors crack. Let the frame flex while two people carry it down a stairwell and the welds around the motor mounts can fail. A queen base weighs anywhere from 120 to 200 pounds fully assembled, so even the lifting is a problem if you do not break it down first. The process below takes about an hour, protects the electronics, and gets the base back together at the new house with all of its functions working.
What You Need
| Item | Why | Optional? |
|---|---|---|
| Owner’s manual or a photo of the label with model number | Confirms which parts detach and which are permanent | No |
| Phone camera | Photos of every connector and bolt location save a lot of guessing during reassembly | No |
| Allen wrench set and adjustable wrench | Most legs, headboard brackets, and retainer bars use 5 mm to 8 mm hex or 13 mm nuts | No |
| Zip-top bags and a marker | Keeps bolts, washers, and the remote grouped by location | No |
| Zip ties or Velcro straps (8 to 12) | Secures cables and motor arms so nothing swings during transit | No |
| Moving blankets (2 to 3) and stretch wrap | Pads the deck and protects the control box | No |
| Furniture dolly or hand truck | A folded queen base still weighs 100-plus pounds | Yes |
| Ratchet straps | Keeps the base from sliding in the truck | Yes |
| A second person | Required for anything larger than a twin | No |
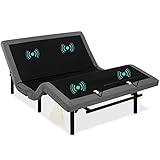
For reference, the Best Choice Products Ergonomic Full Size Adjustable Bed Frame with wireless remote, nightlight, massager, and 2 USB ports sells for about $359.99, and the Queen Size version of the same base runs around $379.49. Bases in this class have detachable legs, a plug-in control box, and a wired-in massage motor, which is the common layout the steps below assume.
As an Amazon Associate we earn from qualifying purchases at no extra cost to you. Product prices and availability are accurate as of the date shown and are subject to change.

Step-by-Step
1. Flatten the base and run the test (5 minutes)
Use the remote to return the head and foot sections fully flat. If the remote has a “flat” or “zero” button, press it and wait until the motors stop. Cycle the head and foot up and down once and note anything unusual: a grinding noise, a slow side, a dead massage zone. Documenting existing problems now means you will not blame the move for them later. Turn on the under-bed light and USB ports too so you know they worked.
2. Remove the mattress and photograph everything (10 minutes)
Lift the mattress off with a helper and lean it against a wall. Now photograph the underside of the base from several angles: the control box, every cable connection, the motor positions, and the leg attachment points. These images are your reassembly manual. Note the leg height setting as well, since many bases offer 6-, 9-, or 12-inch options and you will want the same one at the new house.
3. Cut power and disconnect cables (10 minutes)
Unplug the base from the wall first, then wait 30 seconds before touching connectors. Working from the control box outward, unplug each cable: head motor, foot motor, massage motors, under-bed light, USB harness, and the remote’s power supply if it has one. Most connectors have a small latch or collar; squeeze or twist it rather than pulling the wire. Label each cable end with tape and a marker (“HEAD,” “FOOT L,” “USB”) even if the plugs look different. If the control box unclips from the frame, remove it and wrap it in a towel. Some bases have a battery backup for the remote or a 9-volt cell in the box; pull those out.
4. Secure the motors and actuator arms (5 minutes)
The linear actuators that raise the head and foot are the most vulnerable parts. With the deck flat, zip-tie each actuator arm to the nearest frame rail so it cannot extend or swing. Tuck the disconnected cables against the frame and secure them every 12 to 18 inches with additional ties or Velcro. Nothing should dangle.
5. Remove the legs and retainer bars (10 minutes)
Tip the base onto its side with your helper, or lift one end at a time onto blocks. Legs usually thread on by hand or attach with a single hex bolt each; some have a separate threaded extension for height adjustment. Remove them all, keep each leg with its own hardware, and bag them together. Take off the mattress retainer bar at the foot end and any headboard brackets. Put every bolt, washer, and nut in a labeled bag taped to the frame.
6. Split the base if it is a two-piece design (10 minutes)
Many queen and king bases arrive as two halves joined by a center bracket or a pair of bolts along the midline. Check your photos and the manual: if there is a seam under the fabric deck, unbolt the connecting hardware and separate the halves. A split king is already two independent twin XL bases and needs no splitting, but you should unplug the sync cable between them. Single-piece full and twin bases skip this step.
7. Wrap, pad, and load (15 minutes)
Drape a moving blanket over each section and stretch-wrap it so the fabric deck stays clean and the blanket stays put. Wrap the control box and remote separately and put them in a labeled box that travels inside the car, not the truck bed. Load the base sections flat, deck-side up, never standing on end, since the frame is not designed to bear weight on its edge. Strap them so they cannot shift. Keep at least 6 inches of clearance from heavy furniture that could slide into them.
8. Reassemble in reverse (20 minutes)
At the new home, place the sections where the bed will live before attaching legs; moving a fully assembled base across a room is harder than it looks. Rejoin the halves, thread the legs on to the same height, reattach the retainer bar, and reconnect every cable using your labels and photos. Plug in, let the control box boot for about a minute, then run the head and foot through a full cycle. If the remote does not respond, most bases have a pairing procedure that involves holding two buttons for 5 seconds while the power is cycled; the manual will spell it out.
Mistakes to Avoid
- Moving with the deck raised. Extended actuator arms act like levers and can bend or snap under a side load.
- Carrying by the actuator or motor housing. Grip the frame rails only; the motor mounts are not handles.
- Standing the base on end. Frames are built to carry load downward through the legs, not through the head or foot rail.
- Leaving cables loose. Dangling wires snag on door frames and rip connectors out of the control box.
- Losing the leg hardware. Replacement legs from manufacturers often run $15 to $40 each plus shipping and can take weeks.
- Forcing connectors during reassembly. If a plug does not seat with light pressure, it is the wrong port or the wrong orientation.
- Skipping the test cycle. Any transit damage should be found before the mattress goes on and the warranty claim window closes.
How Often
Full disassembly is only necessary for a move or a room change that involves stairs or narrow doorways. Otherwise, adjustable bases prefer to be left alone. A light maintenance check twice a year is enough: unplug the unit, vacuum dust from the motor housings and control box vents, confirm every cable is still seated, and tighten the leg bolts, which can loosen slightly over time. If you move frequently, keep the original labeled cable bags and your reference photos in the same folder so the next teardown is faster.
When to Call a Pro or Replace
Hire professional movers with furniture experience if the base is a heavy king or a high-end model with integrated headboard, if the route involves more than one flight of stairs, or if you cannot find a second person to lift with you. Specialty white-glove moving for a bed base generally adds $100 to $300 to a local move. Call the manufacturer’s service line instead of a mover if the base has a known fault before the move; some warranties are voided by owner disassembly beyond the legs and cables. Replacement makes more sense when a motor has already failed and the unit is out of warranty, since a single replacement actuator can cost $150 to $300, or when the base is more than 10 years old and uses a proprietary remote that is no longer sold. In 2026, a solid entry-level queen base costs $350 to $500, which is often less than repairing an older premium model.
FAQ
Do I need to remove the motors themselves?
No. Motors and actuators stay bolted to the frame on virtually every consumer base. Just disconnect their cables at the control box and zip-tie the arms so they cannot move.
How heavy is an adjustable bed base?
A twin XL section typically weighs 70 to 100 pounds, a full 110 to 150 pounds, and a one-piece queen 120 to 200 pounds. Splitting a two-piece queen or king cuts each carry roughly in half.
Can I move the base with the mattress still on it?
Only across a flat room with no doorways, and even then it is risky. The mattress adds 60 to 150 pounds and hides the frame rails you need to grip. Always separate the two for any real move.
What if the remote will not pair after reassembly?
First confirm the control box has power and every motor cable is fully seated. Then follow the pairing procedure in the manual, which usually involves unplugging the base, holding a button combination on the remote, and plugging the base back in within 10 to 15 seconds. Fresh remote batteries solve a surprising number of pairing failures.